> ## Documentation Index
> Fetch the complete documentation index at: https://velt.dev/docs/llms.txt
> Use this file to discover all available pages before exploring further.

# Quickstart

> Install and set up Velt in minutes in React, Angular, Vue, or HTML.

Get Velt up and running in your app with comments, presence, and real-time collaboration features. You'll install the package, configure authentication, set up documents, and see collaborative features working immediately.

<Warning>The SDK will not work without proper authentication and document initialization.</Warning>

## Prerequisites

* Package manager (npm, yarn, or pnpm)
* Node.js (v14 or higher)
* React 16+, Vue 2+, Angular 12+, or vanilla HTML/JS
* A [Velt account with an API key](https://console.velt.dev)
* Optional: TypeScript types package for better development experience

## Setup

### Step 1: Install Dependencies

Install the required packages:

<Tabs>
  <Tab title="React / Next.js">
    ```bash theme={null}
    npm install @veltdev/react
    # Optional: npm install --save-dev @veltdev/types
    ```
  </Tab>

  <Tab title="Angular">
    ```bash theme={null}
    npm install @veltdev/client
    # Optional: npm install --save-dev @veltdev/types
    ```
  </Tab>

  <Tab title="Vue.js">
    ```bash theme={null}
    npm install @veltdev/client
    # Optional: npm install --save-dev @veltdev/types
    ```
  </Tab>

  <Tab title="HTML">
    Use our CDN Script

    ```html theme={null}
    <script type="module" src="https://cdn.velt.dev/lib/sdk@latest/velt.js" onload="loadVelt()"></script>
    ```
  </Tab>
</Tabs>

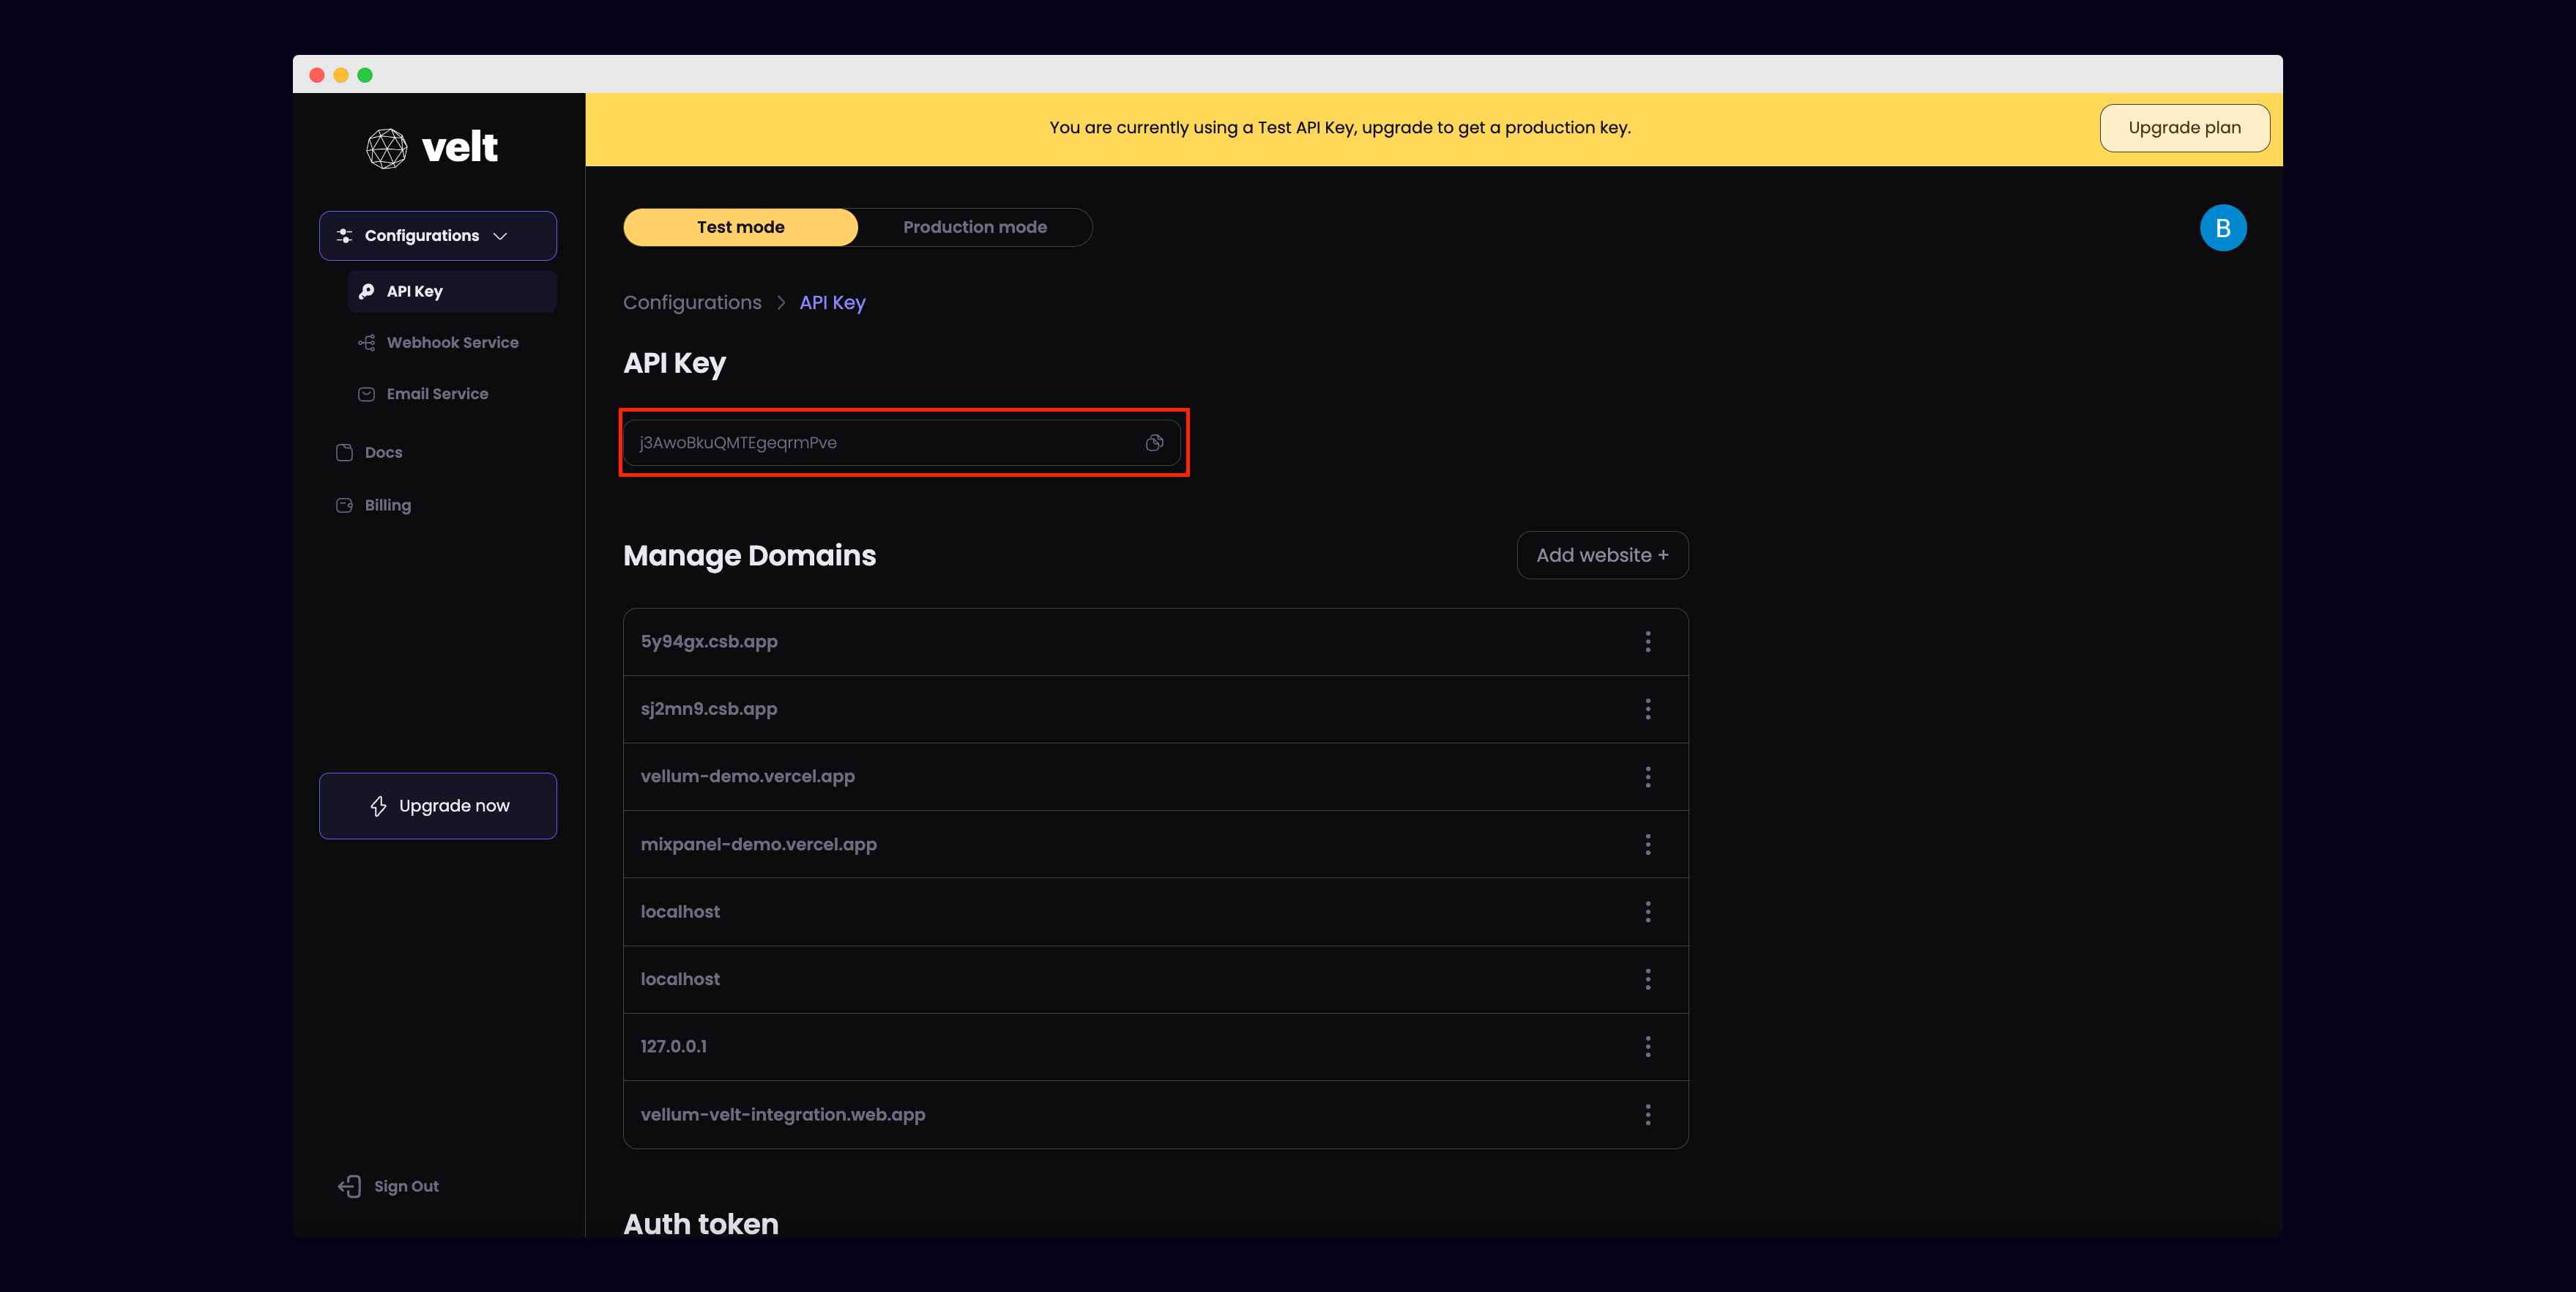
### Step 2: Get Your API Key

1. Go to [console.velt.dev](https://console.velt.dev) and create an account
2. Copy your API key from the dashboard

<Frame>
  <img src="https://mintcdn.com/velt/gY7ilEx2g4g3-HVe/images/velt-console-api-key.png?fit=max&auto=format&n=gY7ilEx2g4g3-HVe&q=85&s=4f1f9f9134b21226a258dc6df730acb0" alt="" width="3518" height="1764" data-path="images/velt-console-api-key.png" />
</Frame>

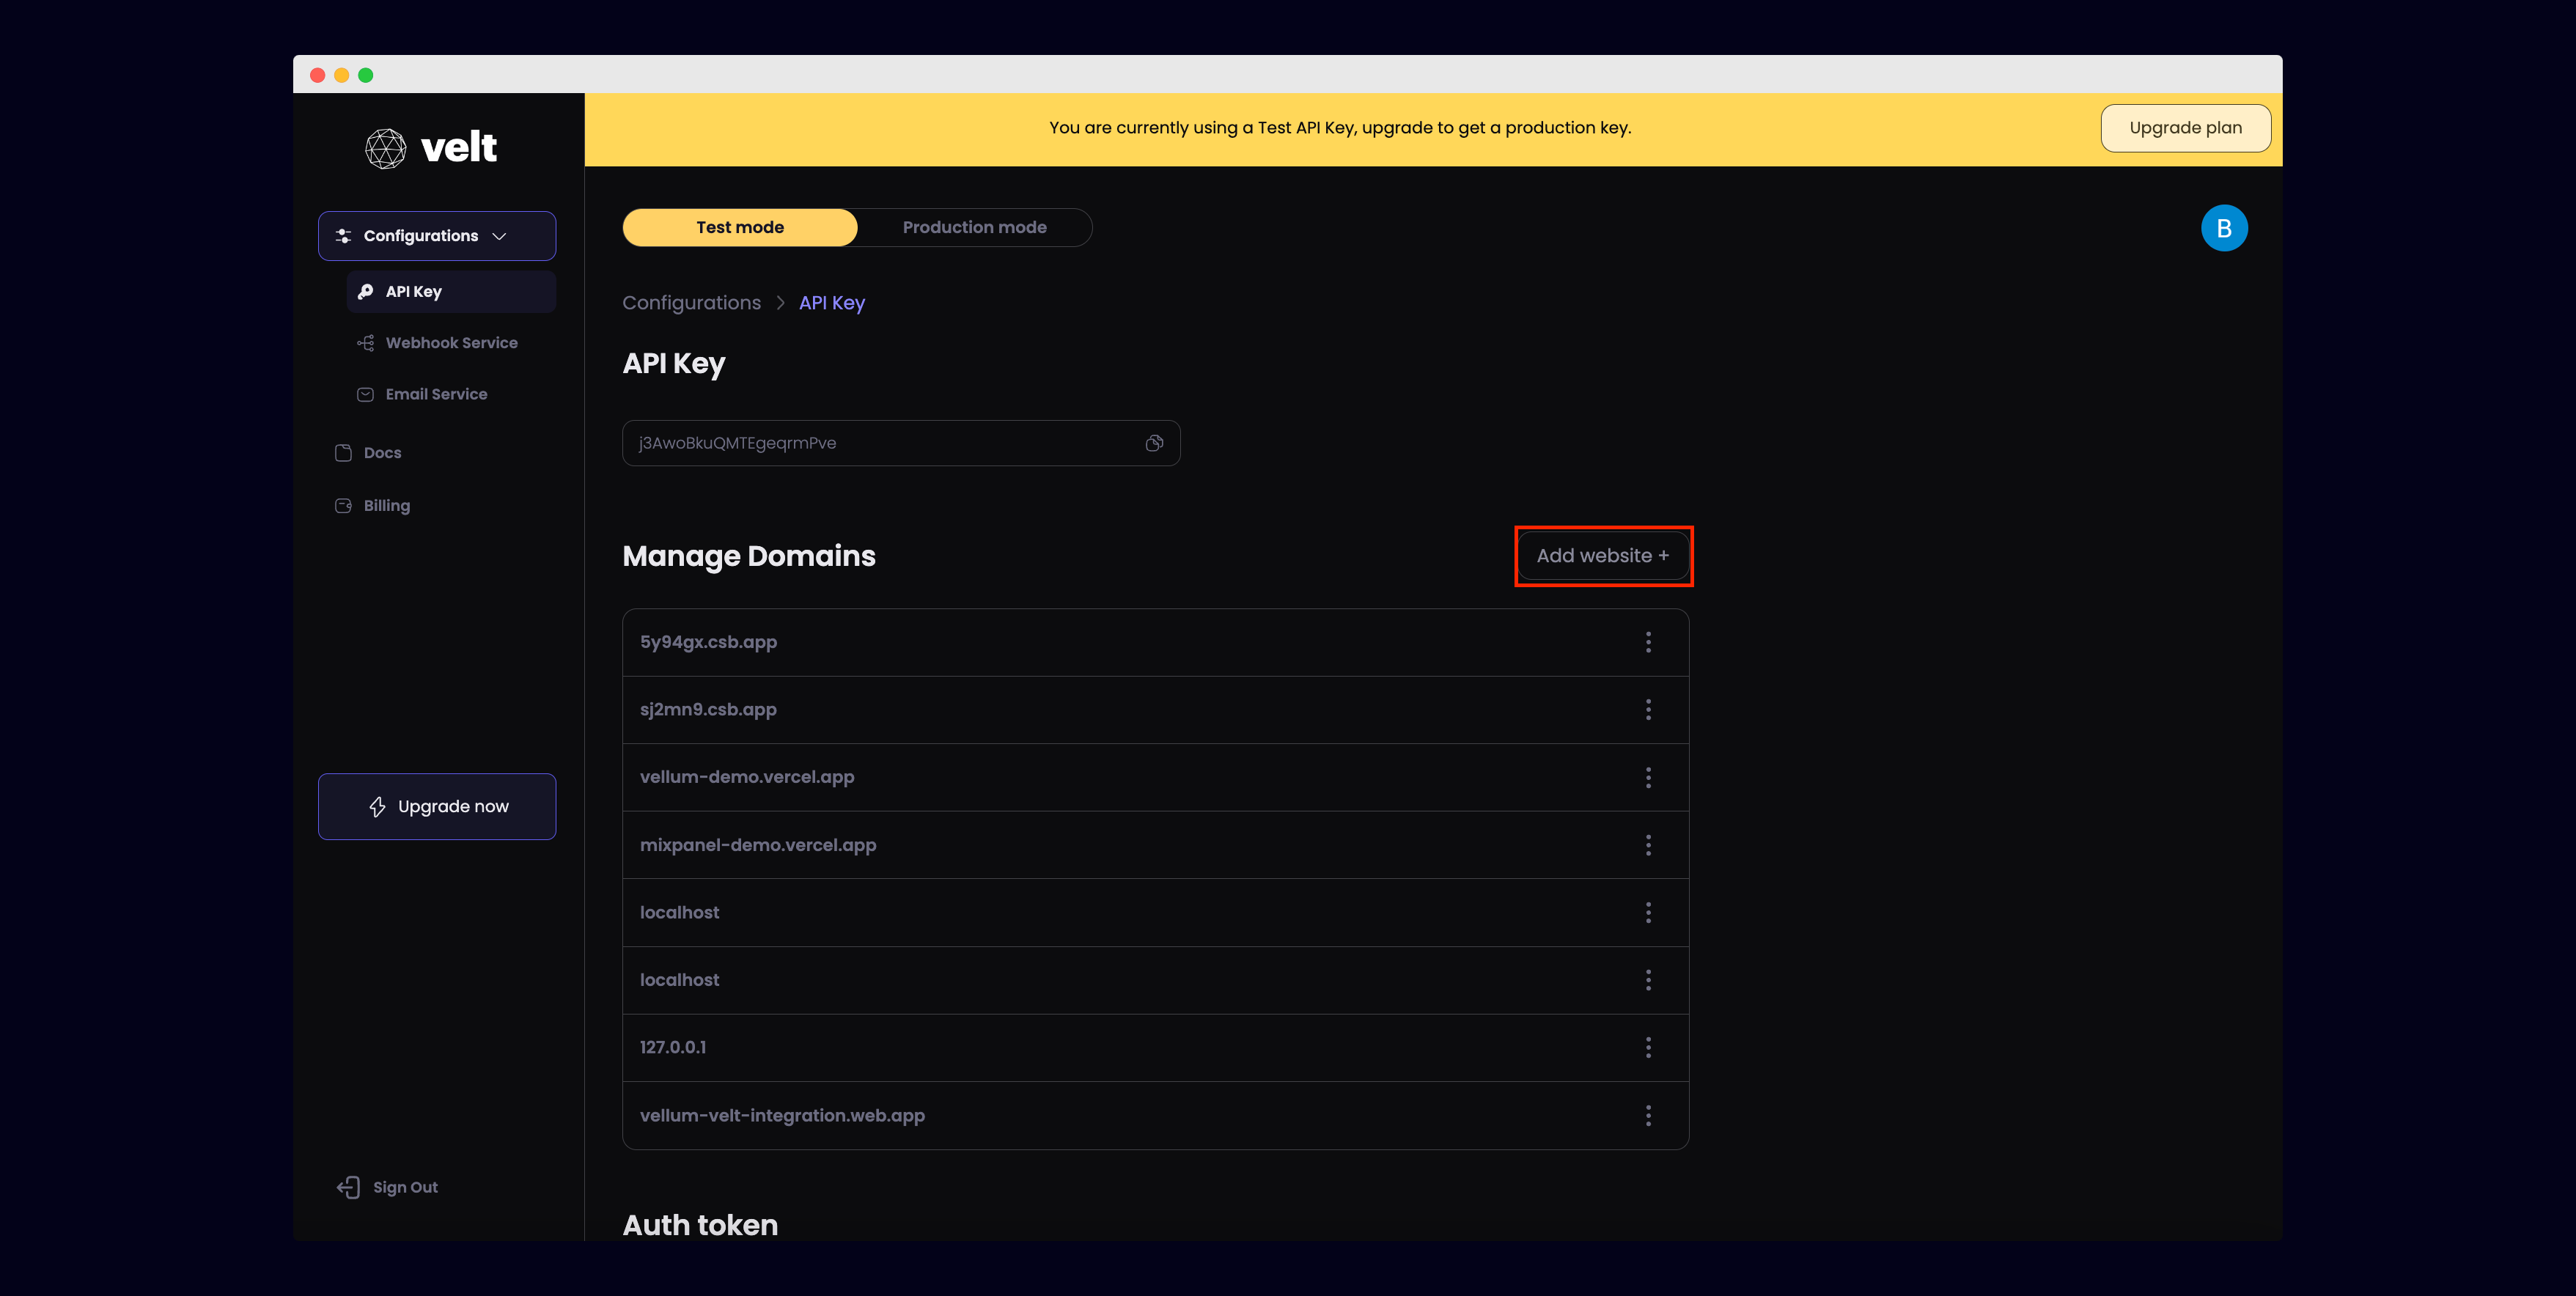
### Step 3: Safelist Your Domain

In the Velt Console, add your app's domain to "Managed Domains" to whitelist it for development and production use.
<Frame>
  <img src="https://mintcdn.com/velt/gY7ilEx2g4g3-HVe/images/velt-console-add-website.png?fit=max&auto=format&n=gY7ilEx2g4g3-HVe&q=85&s=dfd1cbd5f46c28c82ccab8122f30c3eb" alt="" width="3514" height="1768" data-path="images/velt-console-add-website.png" />
</Frame>

### Step 4: Initialize Velt

Initialize the SDK and render the base collaborative components. Pick your framework and:

* React: wrap your app with `VeltProvider` and pass your API key.
* Angular/Vue/HTML: call the init function with your API key to bootstrap the client.

This confirms the SDK is loaded and ready for adding features in later steps.

See the tabs below for your specific implementation:

<Tabs>
  <Tab title="React / Next.js">
    Wrap your app with `VeltProvider` and pass your API key.

    <Warning>If using Next.js, add <code>'use client'</code> directive at the top of files containing Velt components to ensure proper client-side rendering.</Warning>

    <CodeGroup>
      ```jsx Step 1: Provider Setup theme={null}
      'use client'; // MAKE SURE TO INCLUDE 'use client' for Next.js implementation

      import { VeltProvider } from '@veltdev/react';

      export default function App() {
        return (
          <VeltProvider apiKey="YOUR_VELT_API_KEY">
            {/* Your app content */}
          </VeltProvider>
        );
      }
      ```
    </CodeGroup>
  </Tab>

  <Tab title="Angular">
    Step 1: Add `schemas: [CUSTOM_ELEMENTS_SCHEMA]` to allow Angular to render Velt's custom elements (web components).

    Step 2: Boot the Velt client by calling `initVelt` with your API key.

    <CodeGroup>
      ```jsx Step 1: App Module Setup theme={null}
      import { CUSTOM_ELEMENTS_SCHEMA, NgModule } from '@angular/core';
      import { BrowserModule } from '@angular/platform-browser';
      import { AppRoutingModule } from './app-routing.module';
      import { AppComponent } from './app.component';

      @NgModule({
        declarations: [
          AppComponent
        ],
        imports: [
          BrowserModule,
          AppRoutingModule
        ],
        providers: [],
        bootstrap: [AppComponent],
        schemas: [CUSTOM_ELEMENTS_SCHEMA], // Add this line
      })
      export class AppModule { }
      ```

      ```jsx Step 2: Initialize Velt theme={null}
      import { initVelt } from '@veltdev/client';

      export class AppComponent implements OnInit {
        async ngOnInit() {
          await initVelt('YOUR_VELT_API_KEY');
        }
      }
      ```
    </CodeGroup>
  </Tab>

  <Tab title="Vue.js">
    Step 1: Register Velt's custom elements by setting `Vue.config.ignoredElements = [/velt-*/]`.

    Step 2: Boot the Velt client by calling `initVelt` with your API key.

    <CodeGroup>
      ```js Step 1: Main.js Setup theme={null}
      import Vue from 'vue';
      import App from './App.vue';

      // Allow Velt elements
      Vue.config.ignoredElements = [/velt-*/];

      new Vue({
        render: h => h(App),
      }).$mount('#app');
      ```

      ```js Step 2: Initialize Velt theme={null}
      import { initVelt } from '@veltdev/client';

      export default {
        name: 'App',
        async mounted() {
          await initVelt('YOUR_VELT_API_KEY');
        }
      }
      ```
    </CodeGroup>
  </Tab>

  <Tab title="HTML">
    Call `Velt.init('YOUR_VELT_API_KEY')` to bootstrap the client before rendering Velt components.

    <CodeGroup>
      ```js Step 1: Script Include and Init theme={null}
      <script type="module" src="https://cdn.velt.dev/lib/sdk@latest/velt.js" onload="loadVelt()"></script>
        <script>
          async function loadVelt() {
            await Velt.init("YOUR_VELT_API_KEY");
          }
        </script>
      ```
    </CodeGroup>
  </Tab>
</Tabs>

### Step 5: Authenticate Users

There are two ways to authenticate in Velt. Pick one based on your needs:

* **Auth Provider (recommended)**: Configure once and Velt will **fetch/refresh tokens automatically**. See details in the [Key Concepts](/key-concepts/overview#authenticate-a-user).
* **Identify API (more personable)**: Call `identify(user, options)` directly where you need it for more control. If you use Identify, you must refresh tokens yourself, see [Token Refresh](/get-started/advanced#token-refresh).

<Tip>After authenticating, you can retrieve the current user object anytime using [`getCurrentUser()`](/api-reference/sdk/api/api-methods#getcurrentuser) or [`useCurrentUser()`](/api-reference/sdk/api/react-hooks#usecurrentuser).</Tip>

<Warning>
  **Critical Authentication Requirement:**

  * You must authenticate the user. The recommended path is configuring `authProvider` on `VeltProvider` during initialization.
</Warning>

<Tip>
  During development, `generateToken` can be omitted; however, for production it is highly recommended to provide `generateToken` for basic security and seamless token refresh.
</Tip>

You first need to create a user object with the required user information. The `user` object should include the following fields: `userId`, `organizationId`, `name`, `email`, and `photoUrl`.

```javascript theme={null}
// Example user object
const user = {
  userId: 'user-123',
  organizationId: 'org-abc',
  name: 'John Doe',
  email: 'john.doe@example.com',
  photoUrl: 'https://i.pravatar.cc/300',
};
```

<Info>
  **Error Handling**: By default, authentication methods return `null` on failure. You can configure them to throw errors instead by setting `throwError: true`. [Learn more about error handling](/get-started/advanced#error-handling-in-authentication).
</Info>

Then, you need to provide a function that generates a Velt JWT token from your backend. See the [JWT Token Setup](/get-started/advanced#jwt-authentication-tokens). Tokens expire after 48 hours, handle renewals as shown in [Token Refresh](/get-started/advanced#token-refresh).

<Info>
  Access control roles: Assign users as <strong>Editor</strong> or <strong>Viewer</strong> per resource (organization, folder, document) via your JWT token permissions or backend access APIs. Editors can write collaboration data (e.g., add/edit comments); Viewers are read-only. See: [Access Control](/key-concepts/overview#access-control), APIs [Generate Token](/api-reference/rest-apis/v2/auth/generate-token), [Add Permissions](/api-reference/rest-apis/v2/auth/add-permissions), [Add/Update Users](/api-reference/rest-apis/v2/users/add-users).
</Info>

<Tabs>
  <Tab title="React / Next.js">
    ```jsx theme={null}
    return (
      <VeltProvider 
        apiKey="YOUR_VELT_API_KEY"
        authProvider={{
          user,
          retryConfig: { retryCount: 3, retryDelay: 1000 },
          generateToken: async () => {
            const token = await __generateVeltAuthTokenFromYourBackend__();
            return token;
          }
        }}
      >
        {/* Your app content */}
      </VeltProvider>
    );
    ```
  </Tab>

  <Tab title="Angular">
    ```jsx theme={null}
    Velt.setVeltAuthProvider({
      user,
      retryConfig: { retryCount: 3, retryDelay: 1000 },
      generateToken: async () => {
        const token = await __generateVeltAuthTokenFromYourBackend__();
        return token;
      }
    });
    ```
  </Tab>

  <Tab title="Vue.js">
    ```js theme={null}
    Velt.setVeltAuthProvider({
      user,
      retryConfig: { retryCount: 3, retryDelay: 1000 },
      generateToken: async () => {
        const token = await __generateVeltAuthTokenFromYourBackend__();
        return token;
      }
    });
    ```
  </Tab>

  <Tab title="HTML">
    ```html theme={null}
    <script>
      Velt.setVeltAuthProvider({
        user,
        retryConfig: { retryCount: 3, retryDelay: 1000 },
        generateToken: async () => {
          const token = await __generateVeltAuthTokenFromYourBackend__();
          return token;
        }
      });
    </script>
    ```
  </Tab>
</Tabs>

### Step 6: Initialize Document

A **Document** represents a shared collaborative space where users can interact. The `setDocument` method initializes this space and takes a unique `documentId` and optional `metadata`.

By default, users can only access documents within their own organization. Use this to set the document for the current organization the user is logged into.

Learn more about documents [here](/key-concepts/overview#documents).

To subscribe to multiple documents in a single call, use `setDocuments` and pass an array; see [here for more information](/key-concepts/overview#subscribe-to-documents-from-other-organizations).

<Warning>The SDK will not work without initializing the document.</Warning>

<Tabs>
  <Tab title="React / Next.js">
    <CodeGroup>
      ```jsx React / Next.js theme={null}
      import { useEffect } from 'react';
      import { useVeltClient } from '@veltdev/react';

      export default function DocumentComponent() {
        const { client } = useVeltClient();

        useEffect(() => {
          if (client) {
            client.setDocuments([
              { id: 'unique-document-id', metadata: { documentName: 'Document Name' } }
            ]);
          }
        }, [client]);

        return (
          <div>
            {/* Your document content */}
          </div>
        );
      }
      ```
    </CodeGroup>
  </Tab>

  <Tab title="Angular">
    <CodeGroup>
      ```jsx Angular Document Setup theme={null}
      import { Component } from '@angular/core';
      import { initVelt } from '@veltdev/client';

      @Component({
        selector: 'app-document',
        template: `<div><!-- Your document content --></div>`
      })
      export class DocumentComponent {
        client: any;

        async ngOnInit() {
          this.client = await initVelt('YOUR_VELT_API_KEY');
          // Set document for current organization
          this.client.setDocuments([
            { id: 'unique-document-id', metadata: { documentName: 'Document Name' } }
          ]);
        }
      }
      ```

      ```jsx Angular Service Approach theme={null}
      // In your document service
      export class DocumentService {
        client: any;

        async initializeDocument() {
          if (this.client) {
            this.client.setDocuments([
              { id: 'unique-document-id', metadata: { documentName: 'Document Name' } }
            ]);
          }
        }
      }
      ```
    </CodeGroup>
  </Tab>

  <Tab title="Vue.js">
    <CodeGroup>
      ```js Vue.js Document Setup theme={null}
      import { initVelt } from '@veltdev/client';

      export default {
        name: 'DocumentComponent',
        data() {
          return {
            client: null
          }
        },
        async mounted() {
          this.client = await initVelt('YOUR_VELT_API_KEY');
          // Set document for current organization
          this.client.setDocuments([
            { id: 'unique-document-id', metadata: { documentName: 'Document Name' } }
          ]);
        }
      }
      ```

      ```js Vue.js Composition API theme={null}
      import { ref, onMounted } from 'vue';
      import { initVelt } from '@veltdev/client';

      export default {
        setup() {
          const client = ref(null);

          onMounted(async () => {
            client.value = await initVelt('YOUR_VELT_API_KEY');
            // Set document for current organization
            client.value.setDocuments([
              { id: 'unique-document-id', metadata: { documentName: 'Document Name' } }
            ]);
          });

          return {
            client
          }
        }
      }
      ```
    </CodeGroup>
  </Tab>

  <Tab title="HTML">
    <CodeGroup>
      ```js HTML Document Setup theme={null}
      // In your script tag
      async function loadVelt() {
        await Velt.init("YOUR_VELT_API_KEY");

        // Set document for current organization
        Velt.setDocuments([
          { id: 'unique-document-id', metadata: { documentName: 'Document Name' } }
        ]);
      }
      ```

      ```html Complete HTML Document theme={null}
      <!DOCTYPE html>
      <html lang="en">
      <head>
        <meta charset="UTF-8">
        <title>My Document</title>
        <script type="module" src="https://cdn.velt.dev/lib/sdk@latest/velt.js" onload="loadVelt()"></script>
        <script>
          async function loadVelt() {
            await Velt.init("YOUR_VELT_API_KEY");
            Velt.setDocuments([
              { id: 'unique-document-id', metadata: { documentName: 'Document Name' } }
            ]);
          }
        </script>
      </head>
      <body>
        <h1>My Document</h1>
        <velt-comments></velt-comments>
        <!-- Your document content -->
      </body>
      </html>
      ```
    </CodeGroup>
  </Tab>
</Tabs>

### Step 7: Install Velt Feature Components

Add the `VeltComments`, `VeltCommentTool`, and `VeltPresence` components to enable comments and presence features.

Use the tabs below to see the setup for React, Angular, Vue, and HTML.

<Tabs>
  <Tab title="React / Next.js">
    Render the comments surface at the app root; render presence and the comment tool within the document view:

    <CodeGroup>
      ```jsx App.js theme={null}
      import { VeltProvider, VeltComments } from '@veltdev/react';

      <VeltProvider apiKey="YOUR_API_KEY">
        <VeltComments/>
        <YourAuthComponent/>
        <YourDocument/>
      </VeltProvider>
      ```

      ```jsx YourDocument.js theme={null}
      import { VeltCommentTool, VeltPresence } from '@veltdev/react';

      <div>
        <VeltPresence/>
        <VeltCommentTool/>
      </div>
      ```
    </CodeGroup>
  </Tab>

  <Tab title="Angular">
    Render the comments surface in the root template; render presence and the comment tool in the document component template:

    <CodeGroup>
      ```html app.component.html theme={null}
      <velt-comments></velt-comments>
      <!-- Your other components -->
      ```

      ```html your-document.component.html theme={null}
      <velt-presence></velt-presence>
      <velt-comment-tool></velt-comment-tool>
      <!-- Your document content -->
      ```
    </CodeGroup>
  </Tab>

  <Tab title="Vue.js">
    Render the comments surface in App.vue; render presence and the comment tool in your document component:

    <CodeGroup>
      ```html App.vue theme={null}
      <template>
        <div id="app">
          <velt-comments></velt-comments>
          <!-- Your other components -->
        </div>
      </template>
      ```

      ```html YourDocument.vue theme={null}
      <template>
        <div>
          <velt-presence></velt-presence>
          <velt-comment-tool></velt-comment-tool>
          <!-- Your document content -->
        </div>
      </template>
      ```
    </CodeGroup>
  </Tab>

  <Tab title="HTML">
    In your root component add these features (tags inside `<body>`):

    ```html index.html theme={null}
    <body>
      <h1>My Collaborative App</h1>
      <velt-comments></velt-comments>
      <velt-presence></velt-presence>
      <velt-comment-tool></velt-comment-tool>
      <!-- Your app content -->
    </body>
    ```
  </Tab>
</Tabs>

### Step 8: Verify Setup

A good first step is to check if the Velt SDK has been initialized correctly. Open your browser's developer console and run the following command:

```js theme={null}
await Velt.getMetadata()
```

This should return the document metadata you've set. If it returns an error or `null`, check the console for any initialization errors.

**To test comments functionality:**

1. Click the `VeltCommentTool` button, then hover over any element on the page to leave a comment
2. Click the `VeltCommentTool` button, then draw a box on the page to leave a comment
3. Try highlighting any text to leave a comment
4. Test replying to comments and using the comments tool

**To test presence functionality:**

1. Open two browser tabs side by side with one in incognito mode
2. Log in with different users in each tab
3. You should see user avatars appear showing presence in both tabs

<Tip>If you don't see the comments tool, check your browser console for API key or network errors.</Tip>

## Debugging

**Common issues:**

* **Invalid API key or domain not whitelisted**: Verify your API key and ensure your domain is added under "Managed Domains" in the [Velt Console](https://console.velt.dev)
* **Component not rendering**: Ensure the VeltProvider/script loads before your components
* **No collaborative features**: Verify that both authentication and document initialization are properly set up
* **Users can't see each other**: Ensure both users are in the same organization and document
* **Package not found**: Clear npm cache and reinstall (`npm cache clean --force`)
* **TypeScript errors**: Install the optional types package (`@veltdev/types`)

## Notes

* **API Key Required**: Always use a valid API key from the [Velt Console](https://console.velt.dev)
* **Framework Compatibility**: Ensure your framework version meets the minimum requirements
* **Child Components**: Call authentication and document setup methods in child components, never in the same file as your VeltProvider
* **Next.js 'use client'**: Add `'use client'` directive at the top of files containing Velt components for proper client-side rendering
* **Organization ID**: Always include the `organizationId` when identifying users - this is required for proper access control
* **Document Required**: The SDK will not work without calling `setDocument()` - this defines the collaborative space
* **@mention Support**: To enable @mention functionality, set up user contacts [here](/key-concepts/overview#contact-list)
* **Location Support**: For organizing users within documents, learn about Locations [here](/key-concepts/overview#set-location)
* **TypeScript Support**: Install the optional types package for better development experience

## Complete Example

<Tabs>
  <Tab title="React / Next.js">
    <Warning>If using Next.js, add <code>'use client'</code> directive at the top of files containing Velt components to ensure proper client-side rendering.</Warning>

    <CodeGroup>
      ```jsx App.js - Root Component theme={null}
      import { VeltProvider, VeltComments } from '@veltdev/react';
      import AuthComponent from './AuthComponent';
      import DocumentComponent from './DocumentComponent';

      export default function App() {
        return (
          <VeltProvider apiKey="YOUR_VELT_API_KEY">
            <VeltComments />
            <AuthComponent />
            <DocumentComponent />
          </VeltProvider>
        );
      }
      ```

      ```jsx AuthComponent.js - User Authentication theme={null}
      import { useIdentify } from '@veltdev/react';

      export default function AuthComponent() {
        const userService = () => ({
          uid: "user123",
          organizationId: "org123",
          displayName: "John Doe",
          email: "john@example.com",
          photoURL: "https://i.pravatar.cc/300"
        });

        const yourAuthenticatedUser = userService();
        const { uid, displayName, email, photoURL, organizationId } = yourAuthenticatedUser;

        const user = {
          userId: uid,
          organizationId: organizationId,
          name: displayName,
          email: email,
          photoUrl: photoURL,
          color: "#FF6B6B",
          textColor: "#FFFFFF"
        };

        useIdentify(user);

        return <div>User: {user.name}</div>;
      }
      ```

      ```jsx DocumentComponent.js - Document Setup theme={null}
      import { useSetDocument, VeltCommentTool, VeltPresence } from '@veltdev/react';

      export default function DocumentComponent() {
        useSetDocument('my-document-id', { documentName: 'My Collaborative Document' });

        return (
          <div>
            <h1>My Document</h1>
            <p>This is a collaborative document where multiple users can comment and see each other's presence.</p>
            <VeltCommentTool />
            <VeltPresence />
          </div>
        );
      }
      ```
    </CodeGroup>
  </Tab>

  <Tab title="Angular">
    <CodeGroup>
      ```jsx app.module.ts - Module Setup theme={null}
      import { CUSTOM_ELEMENTS_SCHEMA, NgModule } from '@angular/core';
      import { BrowserModule } from '@angular/platform-browser';
      import { AppRoutingModule } from './app-routing.module';
      import { AppComponent } from './app.component';

      @NgModule({
        declarations: [
          AppComponent
        ],
        imports: [
          BrowserModule,
          AppRoutingModule
        ],
        providers: [],
        bootstrap: [AppComponent],
        schemas: [CUSTOM_ELEMENTS_SCHEMA], // Add this line
      })
      export class AppModule { }
      ```

      ```jsx app.component.ts - Component Setup theme={null}
      import { Component, OnInit } from '@angular/core';
      import { initVelt } from '@veltdev/client';

      @Component({
        selector: 'app-root',
        templateUrl: './app.component.html',
        styleUrls: ['./app.component.scss']
      })
      export class AppComponent implements OnInit {
        client: any;

        async ngOnInit() {
          this.client = await initVelt('YOUR_VELT_API_KEY');

          // Authenticate user
          const user = {
            userId: 'user123',
            organizationId: 'org123',
            name: 'John Doe',
            email: 'john@example.com',
            photoUrl: 'https://i.pravatar.cc/300',
            color: '#FF6B6B',
            textColor: '#FFFFFF'
          };
          await this.client.identify(user);

          // Set document
          await this.client.setDocument('my-document-id', { documentName: 'My Document' });
        }
      }
      ```

      ```html app.component.html - Template theme={null}
      <div>
        <h1>My Collaborative App</h1>
        <p>This is a collaborative document where multiple users can comment and see each other's presence.</p>
        <velt-comments></velt-comments>
        <velt-presence></velt-presence>
        <!-- Your app content -->
      </div>
      ```
    </CodeGroup>
  </Tab>

  <Tab title="Vue.js">
    <CodeGroup>
      ```js main.js - Vue Configuration theme={null}
      import Vue from 'vue';
      import App from './App.vue';

      // Allow Velt elements
      Vue.config.ignoredElements = [/velt-*/];

      new Vue({
        render: h => h(App),
      }).$mount('#app');
      ```

      ```js App.vue - Component Setup theme={null}
      import { initVelt } from '@veltdev/client';

      export default {
        name: 'App',
        data() {
          return {
            client: null
          }
        },
        async mounted() {
          this.client = await initVelt('YOUR_VELT_API_KEY');

          // Authenticate user
          const user = {
            userId: 'user123',
            organizationId: 'org123',
            name: 'John Doe',
            email: 'john@example.com',
            photoUrl: 'https://i.pravatar.cc/300',
            color: '#FF6B6B',
            textColor: '#FFFFFF'
          };
          await this.client.identify(user);

          // Set document
          await this.client.setDocument('my-document-id', { documentName: 'My Document' });
        }
      }
      ```

      ```html App.vue Template theme={null}
      <template>
        <div id="app">
          <velt-comments></velt-comments>
          <!-- Your other components -->
        </div>
      </template>
      ```
    </CodeGroup>
  </Tab>

  <Tab title="HTML">
    <CodeGroup>
      ```html index.html - Complete Setup theme={null}
      <!DOCTYPE html>
      <html lang="en">
      <head>
        <meta charset="UTF-8">
        <title>My Collaborative App</title>
        <script type="module" src="https://cdn.velt.dev/lib/sdk@latest/velt.js" onload="loadVelt()"></script>
        <script>
          async function loadVelt() {
            await Velt.init("YOUR_VELT_API_KEY");

            // Authenticate user
            const user = {
              userId: "user123",
              organizationId: "org123",
              name: "John Doe",
              email: "john@example.com",
              photoUrl: "https://i.pravatar.cc/300",
              color: "#FF6B6B",
              textColor: "#FFFFFF"
            };
            await Velt.identify(user);

            // Set document
            await Velt.setDocument('my-document-id', { documentName: 'My Document' });
          }
        </script>
      </head>
      <body>
        <h1>My Collaborative App</h1>
        <velt-comments></velt-comments>
        <velt-presence></velt-presence>
        <velt-comment-tool></velt-comment-tool>
        <!-- Your app content -->
      </body>
      </html>
      ```

      ```html Simple HTML Setup theme={null}
      <!DOCTYPE html>
      <html lang="en">
      <head>
        <meta charset="UTF-8">
        <title>My Collaborative App</title>
        <script type="module" src="https://cdn.velt.dev/lib/sdk@latest/velt.js" onload="loadVelt()"></script>
        <script>
          async function loadVelt() {
            await Velt.init("YOUR_VELT_API_KEY");
          }
        </script>
      </head>
      <body>
        <h1>My Collaborative App</h1>
        <velt-comments></velt-comments>
        <!-- Your app content -->
      </body>
      </html>
      ```
    </CodeGroup>
  </Tab>
</Tabs>

## Next Steps

Now that you've completed the basic setup, you can explore more advanced Velt features and concepts:

* **[Key Concepts](/key-concepts/overview)**: For new developers we recommend reading through our curated list for an in-depth breakdown of the Velt SDK and cool features.
* **[Documents and Locations](/key-concepts/overview#documents)**: Learn how to structure your app's collaborative spaces.
* **[Users and User Groups](/key-concepts/overview#users)**: Configure and manage your users and groups.
* **[Access Control](/key-concepts/overview#access-control)**: Define permissions to control who can access what.
* **[Authentication](/key-concepts/overview#authentication)**: Explore more advanced authentication methods.
* **[UI Customization](/ui-customization/overview)**: Customize layouts, styling, templates, and actions for Velt components.
